111222

How to Scan Barcodes with the Amazon Seller App

If you already sell on Amazon or you’re just starting out, the Amazon Seller app can make day-to-day work a lot easier. It brings most of the essentials to your phone, so you can check performance, update listings, respond to customers, and even spot new products while you’re out and about. One feature many sellers rely on is the built-in barcode scanner, which helps you pull up product details in seconds and get a quick sense of whether an item is worth adding to your catalog.

Below is a simple, practical overview of how the app works and how sellers use barcode scanning to guide product decisions.


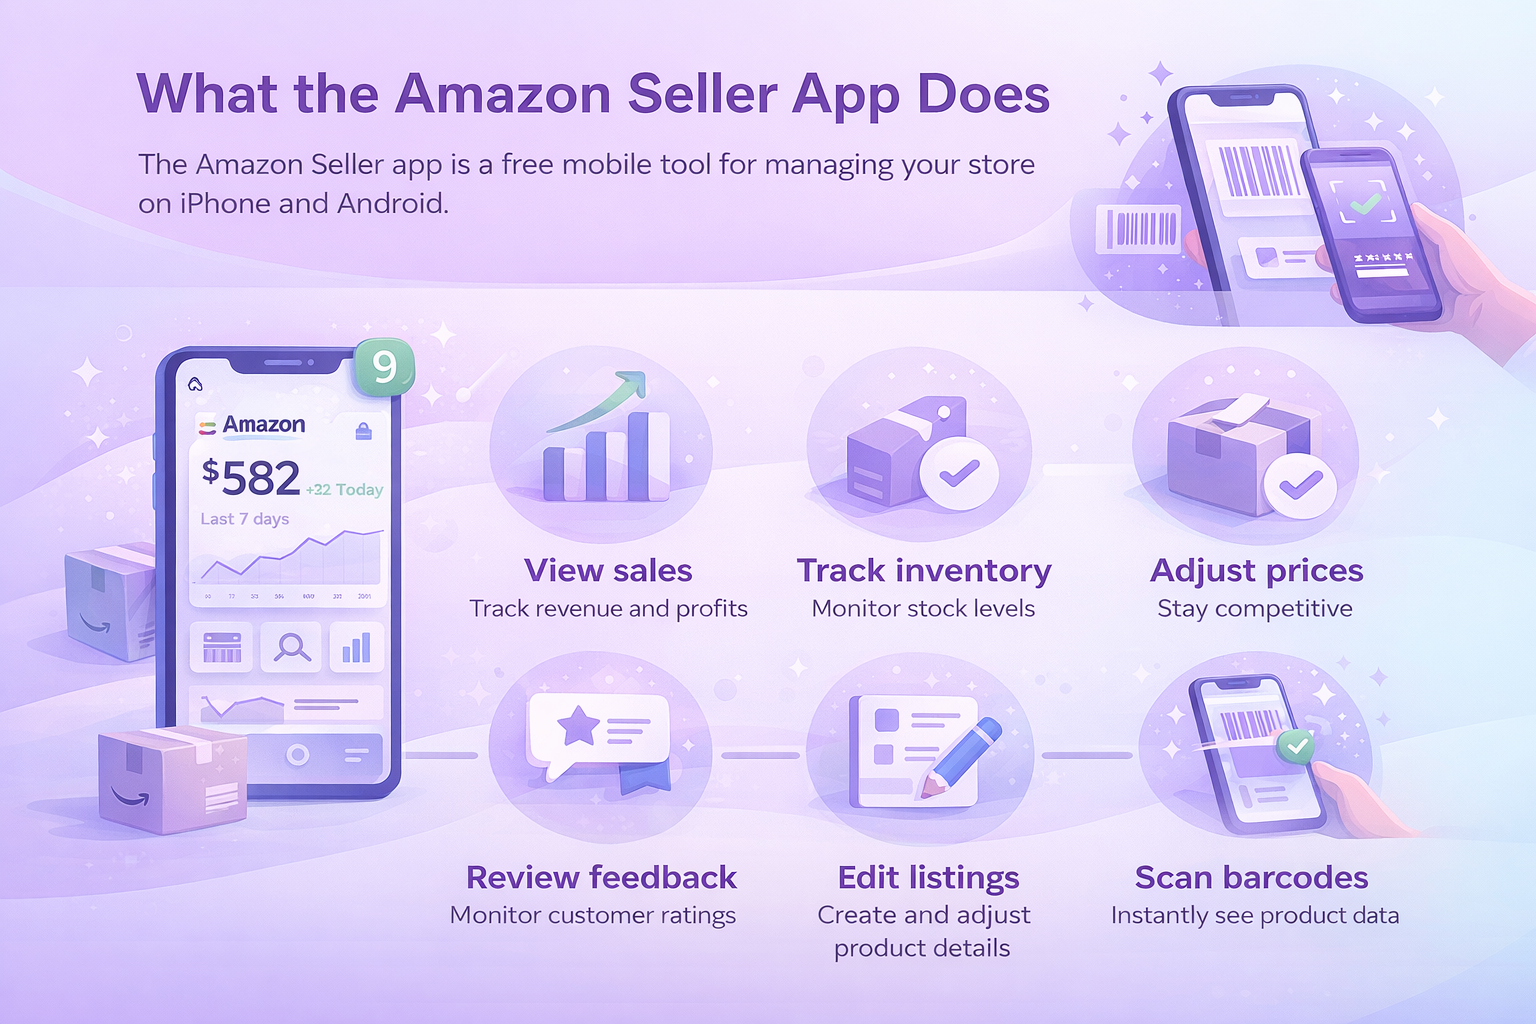
What the Amazon Seller App Does

The Amazon Seller app is a free mobile tool for managing your store. It works on both iPhone and Android. Once logged in, you can view sales, track inventory levels, adjust prices, review customer feedback, and create or edit listings. The scanner feature lets you point your phone at a barcode and instantly see product data from the Amazon store.

Sellers often use this information to understand profitability, compare prices, review sales history, or see how many competitors already offer the same item. It’s a quick way to test ideas and avoid guesswork when evaluating new products.


Turning Scan Data Into Action With WisePPC

At WisePPC, we focus on giving sellers a clearer view of what’s happening across their marketplace accounts, so you can use the data from your barcode scans more effectively. The app helps you understand individual products, but once those items enter your catalog, you still need a wider picture of how they perform over time. That’s where our platform comes in.

We bring your advertising, sales, and historical metrics together in one place. You can see which products are gaining traction, where your margins are slipping, and how your ad spend connects to actual revenue. If you manage a larger inventory or work across several marketplaces, our tools help you track everything without juggling spreadsheets or switching between dashboards.

For many sellers, this combination works well. You scan products to make smarter sourcing decisions, then use WisePPC to monitor long-term trends, adjust campaigns, and scale your catalog with more confidence. It keeps the day-to-day work manageable and gives your team clearer signals on what to improve next.


Requirements to Get Started

Getting set up doesn’t take much. You need an Amazon selling account and a reliable internet connection, and the rest is fairly simple. The app is free, and most people are able to get it running in a few minutes.

  1. Create or sign in to your Amazon selling account: If you’re brand new, you’ll go through a quick registration process. Existing sellers can just log in with their usual credentials.
  2. Download the Amazon Seller app from the Apple App Store or Google Play: Make sure you choose the correct version for your phone so everything works smoothly.
  3. Open the app, sign in, and start exploring: Once you’re inside, the app will guide you through the main features. You can view your dashboard, test the barcode scanner, and get familiar with the tools you’ll use most often.


How to Scan Barcodes in the App

Scanning is simple and usually takes just a few seconds.

  1. Open the app on your phone.
  2. Tap the camera icon or choose Add a Product.
  3. Allow the app to access your camera.
  4. Hold the camera over the barcode on the item.
  5. The app reads it and loads the related product details automatically.

A Quick Note: The UPC is an identification code that sits near the barcode, but the app needs the barcode itself for scanning. The UPC just tells you which product you’re looking at, regardless of who sells it.


How Resellers Use the App

Resellers rely on quick access to accurate product data, and the Amazon Seller app fits neatly into that routine. When they’re scanning items in a store, checking market demand from home, or adjusting active listings, the app gives them the information they need right away. It cuts down on guesswork and helps them decide whether a product is worth buying or relisting.

Resellers often use the app to:

  • Research promising products by checking sales rankings, historical trends, and pricing patterns.
  • Add offers to existing listings and update key details such as price, condition, or keywords that influence search visibility.
  • Handle orders on the go, from confirming shipments to watching fulfillment progress until delivery.
  • Monitor inventory levels so they know when something is running low or when it makes sense to restock.

Not every item can be resold on Amazon. Some categories have limitations or require approval, but the app usually flags these situations clearly so sellers know what their options are before moving forward.


Using Scanner Insights to Strengthen Your Pricing and Sourcing Decisions

Barcode scanning doesn’t just show what a product costs today. It also gives you a quick look at how the item behaves in the market. Sellers often use this information to understand whether a product is moving steadily, whether the Buy Box price shifts a lot, and whether the margin still makes sense after fees. Over time, this helps build a clearer picture of which items deserve more of your attention and which ones might not be worth restocking.

Many sellers also use scan results to compare suppliers. If you see the same product at different price points during sourcing, the data helps you decide which option supports a healthier margin. It becomes easier to walk away from items that look appealing on the shelf but don’t hold enough profit after you factor in Amazon fees and expected sales velocity.


Other Helpful Ways to Use the Amazon Seller App

Managing Customer Feedback

The app gives you a quick way to stay connected with your customers. You can review new messages, monitor recent feedback, and respond when something needs attention. It’s a simple way to keep communication steady and avoid letting small issues turn into bigger problems.

Checking Sales Performance in Real Time

Many sellers keep the app open throughout the day to follow their sales activity. You can watch overall performance, look at individual product trends, and spot unusual spikes or drops. This real-time view helps you react faster and understand how your catalog behaves over time.

Creating and Updating Product Listings

You can build or edit listings directly from your phone. Upload photos, adjust descriptions, update keywords, and set your pricing without needing a computer. It’s useful when you’re sourcing products on the go or handling small updates during a busy day.


Avoiding Common Scanning Mistakes

Scanning barcodes is straightforward, but small mistakes can create headaches later. Sometimes a barcode might be worn out, or the product could have a variation that doesn’t match the listing you expected. The app usually points out issues, but it’s still worth double-checking what you scanned before committing to a purchase.

Another frequent problem is scanning packaging that uses an internal or store-specific code instead of a standard UPC. If something looks off or the product doesn’t show up, try scanning another spot on the label or use a keyword search instead. A few extra seconds of checking can save you from listing errors and mismatched inventory once the item goes live.

Here are a few things to watch out for:

  • Barcodes that are scratched, bent, or partially covered.
  • Packaging that uses nonstandard store labels instead of a UPC.
  • Product variations that share similar packaging but have different listings.
  • Scans that pull up unrelated items or missing product details.
  • Cases where the scan shows a restricted product you can’t sell.


Conclusion

The Amazon Seller app gives you a simple way to manage key parts of your business from your phone. Whether you’re scanning products in a store, checking sales performance, updating listings, or answering customers, the app keeps everything within reach. The barcode scanner, in particular, helps you make faster decisions by giving you quick access to pricing, demand, and historical data. Once you get used to it, the workflow becomes second nature and often saves time you would have spent switching between tools or digging through reports.

If you haven’t tried it yet, the app is free to download and easy to set up. A few minutes of testing can show you how much it can streamline your daily routine and support better sourcing and inventory decisions. It’s a small addition to your toolkit that can make a noticeable difference in how smoothly your business runs.


Frequently Asked Questions

Do I need a paid Amazon plan to use the app?

You need an active Amazon selling account. The app itself is free, and both Individual and Professional accounts can use it, although some features are more useful for high-volume sellers.

Is the barcode scanner accurate?

The scanner usually pulls data directly from Amazon’s catalog, so results are reliable. Issues mostly come from damaged barcodes or packaging that uses internal store labels instead of a UPC.

Can I scan products that I don’t sell yet?

Yes. Many sellers scan items while sourcing inventory to check profitability, restrictions, and current competition before deciding whether to buy.

Does the app show fees and estimated profit?

In most cases, yes. After scanning, you can review estimated fees and get a rough idea of potential margin. It’s a quick way to understand whether a product meets your pricing goals.

Can I manage orders and messages through the app?

You can confirm shipments, track fulfillment updates, reply to customers, and view new reviews. It’s designed to help you handle essential tasks even when you’re away from your computer.

A Practical Guide to Using the Amazon Seller App

Running an online store means staying on top of a lot of moving parts, and the Amazon Seller app makes that much easier. It brings the most important tools from Seller Central straight to your phone, so you can check sales, update listings, and respond to customers wherever you are. This guide walks through how the app works and the different ways it can support your day-to-day operations.


Why the Amazon Seller App Matters for Everyday Operations

Managing an ecommerce business can feel like you’re constantly switching between tasks – checking orders, answering questions, making sure listings are accurate, and keeping an eye on stock. The Amazon Seller app helps pull all of that together so you’re not tied to a laptop whenever something needs attention.

What makes the app valuable is how it simplifies small but important actions. You can respond to customers, track sales spikes, or adjust a listing while you’re out running errands or taking a break between tasks. Those quick moments add up, and for many sellers, it becomes a reliable way to stay in control without losing time.

The app also helps you react faster when something unexpected happens – a sudden jump in orders, a low-stock alert, or a customer message that needs a quick reply. Instead of letting issues build up, you can deal with them right away, which keeps things running smoothly and reduces the stress of playing catch-up later.


How WisePPC Helps You Get Even More Out of Your Amazon Workflow

While the Amazon Seller app keeps you connected to your business day to day, we built WisePPC to give you the deeper visibility and control that help you make smarter decisions as you scale. Our platform brings together advanced analytics, bulk editing tools, and long-term performance insights so you can understand what’s really driving your results, whether it’s your ads, your organic sales, or shifts in customer behavior.

We’re an Amazon Ads Verified Partner, which means our tools follow Amazon’s best practices and use official integrations. With features like multi-account dashboards, granular reporting, and real-time metric tracking, we help sellers cut back on manual work and focus on actions that actually move the needle. It’s a way to pair the convenience of mobile management with the kind of data clarity that keeps your business growing steadily.


9 Practical Ways to Grow Your Business With Mobile App

Managing an online store takes constant attention, and the Amazon Seller app helps you stay on top of things no matter where you are. It brings the most important tools from Seller Central straight to your phone, so you can react quickly, make decisions faster, and keep your business running smoothly. Below are nine practical ways you can use the app to stay organized, improve performance, and support your growth.

1. Spot New Products With Visual Search

When you’re out and about and spot something that looks like a potential product opportunity, the app gives you a quick way to check it. The built-in visual and barcode scanning tool lets you point your phone at an item or its packaging and instantly see whether it’s already listed in the Amazon store.

In a few seconds, you can look through:

  • Current offers for that product
  • Pricing information and recent trends
  • How many sellers are already competing

It’s a simple way to gauge whether an item is worth adding to your catalog. If you’re digging deeper into a category, the app also highlights “Top Sellers” and “Hot New Releases,” which can help you spot demand patterns or new product ideas.

And if you come across something promising, you can start the listing process right from the app by selecting Add a Product.

2. Create, Edit, and Improve Your Product Pages

Product listings are the foundation of your Amazon presence, and the mobile app gives you a simple way to manage them on the go. You can create a new listing for an item that isn’t yet in the Amazon store or link your offer to an existing product page if it’s already there.

Strong visuals play a big part in conversion, so the app includes the Amazon Product Photo Studio. It helps you upload and edit images (such as background removal and cropping), fix common issues, and ensure your photos meet Amazon’s requirements before they go live.

Whether you’re making quick pricing tweaks or updating product details, the entire process is optimized for mobile so you can handle changes anytime.

3. Watch Your Sales Activity in Real Time

The app gives you quick access to your sales data, so you can review performance without logging into a computer. Sales charts show how your business is trending, helping you spot top performers and understand daily or weekly shifts.

If you need more detail, you can switch between different metrics like total sales or units sold, and filter results by date range. When you want to dig deeper, you can generate and download sales reports directly from your phone.

There’s also a Payments section where you can review statements, refunds, active orders, and other transactions. Keeping an eye on these numbers makes it easier to spot new opportunities or areas where you can improve.

Pro Tip: Customize your push notifications so you never miss important updates, new orders, or messages from customers.

4. Manage Stock, Shipping, and Deliveries

The Amazon Seller mobile app gives you a clear view of what’s happening with your orders from the moment a customer checks out to the point their package is delivered. You can track pending orders, monitor shipments, and handle returns or refunds as they come in.

For inventory, the app helps you stay ahead of stock levels so you can plan replenishments before running into issues. You can review quantities, generate inventory reports, and use the insights to make smarter forecasting decisions.

It’s a practical way to stay organized and maintain smooth operations, even when you’re away from your workspace.

5. Keep Your Advertising Strategy Sharp

If you use advertising to boost visibility, the mobile app gives you tools to manage your campaigns wherever you are. You can adjust budgets, tweak timelines, and check performance for cost-per-click ads like Sponsored Products.

The app also shows simple charts that help you monitor how your ads influence sales, so you can quickly see what’s working and what may need attention. Making small changes on the go can help keep your campaigns efficient without waiting until you’re back at a computer.

Pro Tip: Give your ads and product pages a lift with SEO best practices. Improving keywords and content quality can help customers find your products more easily.

6. Stay Connected With Customers

Good communication plays a big role in building trust with shoppers, and the mobile app makes it easy to stay on top of messages. In the Communications section, you can read and reply to customer inquiries, filter for messages that still need responses, and search your inbox using keywords when you’re looking for something specific.

If you often get similar questions, you can save time by creating reusable email templates. The app also gives you access to the Feedback Manager, where you can check reviews, track ratings over time, and post public replies when needed.

It’s a straightforward way to stay responsive and maintain strong customer relationships, even when you’re away from your desk.

7. Expand Your Reach Worldwide

If you sell in more than one region, the app helps keep everything connected. With a single sign-on, you can switch between different countries and marketplaces where your products are available. It’s a simple way to stay aware of activity across all your storefronts without juggling multiple logins.

To grow globally, you only need one Amazon selling account. Once it’s set up, you can launch in additional regional stores and use the app to monitor performance, check orders, and manage listings for each market. It’s a practical approach for sellers who want to reach customers worldwide without complicating their workflow.

8. Monitor Key Health Metrics

The app keeps you informed about updates that may affect your business. When you open the homepage, you’ll see alerts that highlight important news, policy changes, or items that may need your attention. Tapping an alert takes you straight to the details so you can review and take action quickly.

You’ll also find recommendations to help improve your performance, strengthen customer experience, and maintain a healthy selling account. It’s an easy way to stay ahead of potential issues and keep your operations running smoothly.

9. Monitor Performance Insights and Recommendations

The app doesn’t just show raw numbers – it also highlights areas where you can improve. Inside the Performance and Insights sections, you’ll find recommendations based on your recent activity, sales trends, and customer behavior. These suggestions can include anything from adjusting a listing to reviewing pricing or improving delivery performance.

You can also keep an eye on key metrics that influence your overall visibility and customer satisfaction. If something starts slipping or needs attention, the app flags it early so you can respond quickly.

It’s a simple way to make more informed decisions and stay aligned with Amazon’s best practices without having to dig through multiple reports.


Tips for Getting the Most Out of Mobile Management

Once you make the app part of your daily routine, you’ll notice how much time it saves and how much easier it becomes to stay organized. These simple habits can help you get even more value from managing your Amazon business on your phone:

  • Check sales and messages early. A quick morning glance at your dashboard helps you start the day knowing what needs attention.
  • Use the scanning tool while sourcing. If you’re shopping for new inventory, scanning items on the spot can save guesswork and help you avoid risky buys.
  • Review inventory once or twice a day. Keeping an eye on stock levels helps you avoid unexpected shortages.
  • Watch ad performance during active campaigns. A quick look at how ads are trending can help you adjust budgets or bids before spending gets out of hand.
  • Clear out notifications regularly. It keeps your dashboard clean and helps you focus on what’s actually important.
  • Use downtime wisely. Short waiting moments – in line, between meetings, on a commute, are perfect for checking messages or reviewing orders.

There’s no single routine that works for everyone. The goal is to build habits that make your workflow easier and help you stay connected to your business without feeling glued to your device.


Conclusion

The Amazon Seller app may be small in size, but it packs in nearly everything you need to keep your business moving. Whether you’re checking orders, responding to customers, adjusting ads, or exploring new product ideas, the app makes everyday tasks quicker and more manageable. It’s not meant to replace your full Seller Central workflow, but it does make it easier to stay organized and react when something needs attention.

Once you build it into your routine, it becomes one of those tools you reach for without thinking – a simple way to stay connected to your store and keep things running smoothly, wherever you are.


Frequently Asked Questions

What does the Amazon Seller app do?

The app gives registered Amazon sellers a mobile-friendly way to manage their business. You can scan products, update listings, track sales, communicate with customers, monitor ads, and keep an eye on account health – all from your phone.

Do I need approval to use the Amazon Seller app?

No approval process is required. As long as you have an active Amazon selling account, you can download the app and sign in with your Seller Central credentials.

Can I use the Amazon Seller app on a laptop?

The app is designed for iOS and Android mobile devices. On a laptop or desktop, you can simply log in to Seller Central through your browser instead.

Is the app free to download?

Yes, the app itself is free. Standard selling fees still apply to your Amazon account.

Give Returns a Second Life with FBA Grade and Resell

Customer returns are part of selling online, but they don’t always have to be a loss. With Amazon’s FBA Grade and Resell program, unsellable returns can be inspected, refurbished when possible, and listed again as Used. Instead of paying removal or disposal fees, you get the chance to recover value and offer customers more affordable options.

This guide walks through how the program works, what to expect during grading, how fees are calculated, and how to manage your listings once they go live.


What FBA Grade and Resell Does

The Grade and Resell program evaluates customer-returned FBA inventory and determines whether each item can be resold in a Used condition. If the product passes inspection, Amazon creates a Used listing for you and assigns one of four possible conditions: Like New, Very Good, Good, or Acceptable. You set the pricing rules and manage the listing the same way you do for your new or used products today.

If an item doesn’t meet the requirements, it’s marked Unsellable and remains in your unfulfillable inventory, where you can remove, liquidate, or donate it.

FBA Grade and Resell is available to both US and non-US sellers who sell in the US marketplace.


How We Help You Get More Out of Grade and Resell at WisePPC

At WisePPC, we see FBA Grade and Resell as more than a way to recover value from returns – it’s a chance to strengthen your entire marketplace strategy. When a returned item becomes a second sale, every decision leading up to that moment matters. Pricing, advertising, visibility, customer demand  it all plays a role. That’s why we designed our platform to give you the kind of insight that makes these programs work harder for you.

With WisePPC, you can track how your ads and product performance shift as more of your catalog flows through Grade and Resell. Our analytics help you see what’s driving real results, whether it’s your campaigns, your organic reach, or your pricing choices. When used items hit the marketplace, you’ll know exactly how fast they’re selling, how they affect your margins, and where you can adjust to capture more value.

We combine official Amazon Ads integrations, real-time metrics, and years of historical data so you can make smarter decisions without digging through spreadsheets. As returns turn into resale opportunities, we give you the visibility to identify trends early, optimize your budgets, and scale with confidence. For sellers using programs like Grade and Resell, this level of clarity can turn a simple recovery tool into a meaningful revenue stream.


How the Process Works

1. Enroll in the Program

You can join Grade and Resell through your Automated unfulfillable settings. This is where you enable the program, set pricing rules, and choose any ASINs you want excluded.

Once enrolled, eligible customer returns route automatically into the program as long as they’re located in fulfillment centers that support Grade and Resell.

2. Returned Items Are Inspected and Graded

Every customer return goes through Amazon’s standard evaluation process to determine whether it’s sellable as New. Items ruled unsellable as New are sent into the grading process.

A returns specialist completes a full inspection, which can include:

  • Matching the physical item with the catalog listing
  • Checking for missing parts or accessories
  • Identifying cosmetic blemishes or package damage
  • Testing basic usability or functionality
  • Performing memory wipes or factory resets for electronics
  • Cleaning or repackaging the item when needed

Based on these checks and Amazon’s guidelines, the item is assigned:

  • Used–Like New
  • Used–Very Good
  • Used–Good
  • Used–Acceptable
  • Or Unsellable

If it’s graded as Used, Amazon prepares it for resale. If it’s Unsellable, it stays in your unfulfillable inventory.

The grading timeline can take up to three weeks, and sometimes longer during peak seasons.

3. A New SKU Is Created for the Used Listing

Once the condition is assigned, Amazon generates an SKU under the parent ASIN. The SKU includes:

  • A prefix: amzn.gr
  • Your seller MSKU
  • A defect identifier
  • A condition suffix (LN, VG, GD, or AC)

The SKU appears in your inventory just like any other listing, and you can manage it normally. If you’re out of stock, the SKU may be automatically deleted, and a new one created for future graded units.

4. You Set the Price and Manage the Listing

During enrollment, you define your pricing rules as a percentage discount from the new price. For example:

  • Like New: 95 percent of new price
  • Very Good: 85 percent
  • Good: 80 percent
  • Acceptable: 75 percent

These are only examples. You choose the percentages that make sense for your business. Once the listing is created, you can adjust pricing anytime.

Customers will see your Used offers under “More buying choices” or as the Used featured offer when applicable. They also see condition notes generated from the grading process that describe any cosmetic or packaging issues.

5. Track Sales and Payments

Sales and order information appears in your usual Fulfillment reports. You can identify program activity by looking for SKUs that start with amzn.gr.

Your Payments dashboard shows:

  • Order payments for sold units
  • Grade and Resell processing fees
  • Any adjustments or reimbursements

Dedicated Grade and Resell reporting is planned but not yet available.

6. After-Sales: Reviews, Feedback, and Returns

Customer reviews for Grade and Resell items roll up to the parent product when they meet Amazon’s guidelines. Feedback related to item condition or defects does not impact Account Health metrics.

If a customer returns a Grade and Resell item:

  • If eligible, the unit is automatically re-submitted for grading
  • If ineligible, it returns to your unfulfillable inventory
  • If a returned unit is found defective, Amazon refunds the processing fee as a courtesy

You can monitor comments and potential issues through Voice of the Customer or Feedback Manager.


Product Eligibility

Not every return can go through Grade and Resell. Ineligible items include:

  • FBA-prohibited products
  • Meltable inventory
  • Expiration-dated items
  • Dangerous goods
  • Products requiring approval
  • Items that can’t be sold as Used
  • Recalled or counterfeit goods
  • Consumables
  • Items under 10 dollars
  • ASINs with low historical feedback

Only returned units located in enabled fulfillment centers are eligible.


Why Sellers Use Grade and Resell

The program offers multiple advantages that go beyond simple cost savings. For many sellers, it becomes an easy way to make their returns process work in their favor instead of against them.

Recover More Value

Returns used to sit in storage or move straight into removal orders, turning into expenses rather than revenue. With Grade and Resell, those same items get a second chance on the marketplace. Even modest recoveries add up over time, especially for high-volume ASINs. What once felt like a sunk cost can become a meaningful part of your margins.

Reduce Operational Work

Handling returns on your own can be tedious. Grading, inspecting, repackaging, and updating listings all take time that most teams don’t have. Grade and Resell removes almost all of that work. Once you’re enrolled, Amazon evaluates and relists eligible units automatically. You simply monitor pricing and performance the same way you would for any other listing.

Reach Secondhand Shoppers

A growing segment of customers actively looks for used items, whether to save money or to avoid buying new when they don’t have to. Grade and Resell makes your products visible to this audience without extra effort on your part. Used listings appear in search results and on the main product detail page, giving shoppers another option within your catalog.

Support Sustainability

Sustainability has become a deciding factor for many buyers. When your products get reused rather than thrown out, it sends a positive message about your brand’s values. Extending the life of an item reduces waste and keeps perfectly functional products in circulation. Amazon has noted that more than 100 million customers have opted for sustainable alternatives, showing how quickly demand is shifting toward reuse and secondhand buying.


Getting Started

To enroll:

  1. Go to Settings
  2. Open Fulfillment by Amazon
  3. Find Automated unfulfillable settings
  4. Enable Grade and Resell
  5. Set your recovery percentages
  6. Exclude any ASINs you don’t want graded
  7. Save your settings

You can unenroll at any time by deselecting the program in the same menu.


Final Word

FBA Grade and Resell gives sellers a practical way to turn returns into something useful instead of a cost that quietly drains profit. Amazon handles the inspection, grading, and relisting, which makes the entire process feel almost hands-off once your settings are in place. What used to be a pile of returns collecting storage fees can become a steady stream of recovered value, new customers, and better use of inventory you already own.

Beyond the operational benefits, the program supports a shift many shoppers are already embracing. More buyers are open to secondhand items, both for the lower price and for sustainability reasons. Grade and Resell helps you meet that demand while reducing waste and giving your products a longer lifecycle.

For sellers looking to improve margins, simplify returns, and appeal to a broader customer base, this program is a straightforward way to get more out of the inventory you already have. It’s a small adjustment that can lead to a noticeable change in how you manage returns and recover revenue.


Frequently Asked Questions

Who can join the FBA Grade and Resell program?

Both US and non-US sellers who sell in the US marketplace are eligible. As long as your FBA inventory is stored in a fulfillment center that supports the program, you can participate.

What types of items are eligible?

Only customer-returned FBA inventory can be graded. Certain categories are excluded, including hazmat products, consumables, meltable items, expiration-dated inventory, counterfeit or recalled products, and items that can’t be sold in used condition. Items priced under 10 dollars are also not eligible.

What happens if my item is graded Unsellable?

If an item doesn’t meet Amazon’s condition requirements, it stays in your unfulfillable inventory. No processing fee is charged. You can remove, liquidate, or donate it the same way you would with other unfulfillable units.

How long does the grading process take?

Most items are graded within three weeks. During busy seasons, such as Q4, the timeline may be longer.

Can I control how much my Used items sell for?

Yes. You set the pricing rules for each condition when you enroll. Once the listing is live, you can adjust the price anytime in Manage Pricing.

What Amazon Brand Registry Is and How It Works

Building a brand often comes with a mix of excitement and pressure. You’re shaping how customers see your products while also trying to keep your identity safe in a crowded marketplace. Intellectual property plays a big part in that, whether it’s a trademark, a patent, or creative work you’ve produced.

Amazon created Brand Registry to help brand owners protect what they’ve built and give them tools to grow with more confidence across the Amazon store.

If you’re still working on getting a trademark, programs like Amazon IP Accelerator can speed things up. Here’s a clearer look at what the Brand Registry offers, who qualifies, and how it can help you build and protect your brand.


What Is Amazon Brand Registry?

Brand Registry is a free program designed to help brand owners safeguard their intellectual property and manage the accuracy of product listings. Once enrolled, Amazon uses the information you provide to verify you as the brand owner and activate different protections and tools.

You don’t need to be actively selling on Amazon to enroll, but you do need a registered or pending trademark.


Why Brand Registry Matters for Growing Brands

For many businesses, Amazon is one of the first places customers discover new products. That visibility can help a brand grow quickly, but it also introduces a few challenges. Competing sellers may list similar items, product pages can be edited by multiple contributors, and unauthorized sellers sometimes offer products that don’t meet your standards. All of this can make it harder to maintain a consistent brand identity.

Brand Registry exists to give brand owners more control in an environment that moves fast. Once your brand is verified, Amazon treats your product data as the source of truth. That means fewer mix-ups with product details, fewer inaccurate listings, and a stronger block against sellers misusing your name or creative assets.

The program also opens the door to brand-building tools that normally aren’t available to unverified sellers. Whether you’re refining your messaging, testing new content, or trying to understand how shoppers interact with your products, Brand Registry gives you the systems and insights to manage your presence more confidently across the Amazon store.


Why Registered Brands Choose WisePPC to Scale Faster

At WisePPC, we see a clear pattern. Once brands enroll in Amazon Brand Registry and secure their identity, the next challenge is growth. That’s where we come in. Brand protection is important, but it’s only the first step. To truly scale, you need visibility into what’s working, what’s wasting budget, and where the next opportunity is hiding. Our platform is built to make that level of clarity effortless.

We designed WisePPC to turn complex marketplace data into insights you can act on immediately. With real-time analytics, deep historical reporting, and tools that highlight your strongest drivers of sales, you can refine your strategy faster and with far more confidence. Many of our users discover trends they couldn’t see anywhere else and make optimizations that directly impact their bottom line.

As an Amazon Ads Verified Partner, we rely on official integrations and best practices to ensure every decision is rooted in accurate data. Whether you’re managing a lean catalog or running hundreds of SKUs across multiple channels, we give you the control, speed, and precision needed to scale your brand in a crowded marketplace. When Brand Registry protects your identity, WisePPC helps unlock its full potential.


What You Gain by Enrolling in Brand Registry

Automated Protections

One of the biggest advantages of Brand Registry is that Amazon begins proactively monitoring your catalog the moment you provide your brand details. The system uses machine learning to compare new listings against the information you’ve submitted. If something looks off, like a listing with mismatched images or suspicious branding, it’s flagged or blocked before it appears to customers. Over time, these protections become more accurate as the system learns how your genuine products look and how your brand is used across Amazon.

Reporting Tools

Even with automated systems in place, you still have full control to review the catalog manually. The reporting tools make it easy to search for listings that may violate your intellectual property, whether it’s your trademarked name, copyrighted images, or patented product features. If you find something that shouldn’t be there, you can file a report directly from the dashboard. Amazon then reviews the claim and takes action when appropriate, helping you keep your brand presence clean and consistent.

Specialist Support

When issues come up that aren’t easy to solve on your own, Brand Registry gives you access to a dedicated support team trained to handle brand-specific concerns. They can help clarify policy questions, resolve listing errors, guide you through technical steps, or explain what documentation you need for certain types of claims. This direct support saves time, especially when you’re dealing with problems that affect your catalog or customer experience.

Neutral Patent Evaluation

If you own a utility patent and notice another seller offering a product that appears to copy your protected invention, Amazon provides a structured alternative to a costly legal battle. The Neutral Patent Evaluation program uses a third-party expert to review both sides’ evidence and reach a decision. It’s a faster and far less expensive process than going to court, and the final decision is enforced within the U.S. Amazon store. This helps protect genuine innovations without overwhelming smaller brands with legal fees.

Impact Dashboard

The Impact Dashboard gives you a behind-the-scenes look at how Amazon is using your brand information to safeguard your products. You can see metrics such as the number of blocked listings, removed violations, and other actions taken to keep your catalog accurate. It’s a straightforward way to understand how your enrollment contributes to reducing unauthorized or misleading listings.

Education and Help Center

Brand Registry also includes a library of resources designed to help you make the most of your enrollment. This includes guides on brand protection, walkthroughs of each tool, policy explanations, and FAQ sections that answer common questions. Whether you’re new to Amazon or refining your existing strategy, these materials help you navigate the program with more confidence.


Tools and Features You Unlock Through Brand Registry

Enrolling gives you access to a wide range of programs focused on visibility, customer engagement, sales performance, and brand protection. Here’s a condensed look at the main tools.

1. Grow Your Reach

  • Amazon Vine: Invite trusted reviewers from Amazon’s Vine community to try your products and share feedback. This can help new or slow-moving items get early traction.
  • Amazon Live: Run livestreams, answer questions in real time, and introduce your products to new audiences through interactive video content.
  • Advertising Options: Use Sponsored Products, Sponsored Brands, or Sponsored Display to help more shoppers discover your brand.

2. Increase Sales

  • A+ Content: Enhance product pages with richer visuals, clearer explanations, and branded storytelling to help shoppers understand your items more easily.
  • Amazon Stores Builder: Create a multi-page storefront where your brand lives in one place. It’s a good way to present your full catalog with consistent branding.
  • Virtual Bundles: Combine related products into a single offer to improve visibility and average order value.
  • Manage Your Experiments: Run A/B tests on titles, images, and A+ Content to see which versions perform better.

3. Build Customer Loyalty

  • Subscribe & Save: Let customers set up recurring delivery for items they buy often, usually at a small discount.
  • Manage Customer Engagement: Send brand-focused emails to your most engaged customers. You can highlight new products, seasonal themes, or important announcements.

4. Improve Your Strategy

  • Brand Analytics: Access detailed reports about search behavior, customer shopping patterns, and competitive trends.
  • Brand Referral Bonus: Earn a bonus when you drive traffic from off-Amazon sources that convert into sales.
  • Amazon Attribution: Measure how your marketing channels outside Amazon contribute to sales inside the Amazon store.
  • Brand Metrics: See how customers move through the purchase funnel and where your brand stands at each stage.


Eligibility, Enrollment, and Costs

Who Can Join Brand Registry?

You’ll need a registered trademark or a pending application, either text-based or image-based, in each country where you want to enroll. Some pending applications are accepted depending on the trademark office and region.

If you don’t have a trademark yet, IP Accelerator can connect you with vetted law firms that specialize in trademark filings. Brands using IP Accelerator typically get quicker access to Brand Registry benefits.

How to Enroll

Once your trademark is registered or pending, and your products or packaging display your brand name or logo, you can start the enrollment process:

  1. Sign into Brand Registry with your Seller Central credentials.
  2. Select “Enroll a Brand.”
  3. Enter your brand information, choose your trademark office, and provide your registration or serial number.
  4. Upload a high-resolution logo if applicable.
  5. Provide product images that show the brand name or logo permanently attached.
  6. Confirm whether you’re a seller, vendor, or both.
  7. Select the categories your products belong to.
  8. Share manufacturing and distribution details.
  9. Submit your application.

Amazon will send you a verification code that you’ll need to return to complete enrollment.

How Much Does It Cost?

Brand Registry itself is free. Some features you unlock may have associated costs, such as advertising or product testing tools.


How Brand Registry Supports Long-Term Brand Growth

Once you’re enrolled, Brand Registry becomes more than just a safety layer. Many of the tools you unlock help shape the bigger picture of how customers interact with your products and how your brand evolves over time.

With analytics available directly inside Seller Central, you start to see clearer patterns in customer behavior. Search query reports, funnel metrics, and purchase trends all give you a better sense of what people respond to and where there are gaps worth exploring. These insights often influence product development, pricing decisions, or the way you position your catalog.

Experimentation becomes easier too. Tools like Manage Your Experiments let you test images, titles, or A+ Content without guessing which version will perform better. Over time, this helps keep your product pages consistent and more in line with what customers expect from your brand.

And as more shoppers follow your brand or subscribe to repeat deliveries, you build a relationship that goes beyond a single purchase. Features like Brand Follow and Manage Customer Engagement allow you to stay visible to your most loyal audience, share updates, and keep them connected to what you’re creating next.

Altogether, these pieces make Brand Registry a long-term partner in shaping your presence in the Amazon store, not just protecting it.


Mistakes to Avoid During Enrollment

Enrollment is fairly simple, but a few small oversights can slow things down. Taking a moment to check these areas upfront usually makes the process smoother.

Branding That Isn’t Clearly Visible

Amazon needs to see your brand name or logo printed directly on the product or its packaging. Older images, temporary labels, or anything that doesn’t reflect the real branding can trigger delays. Clear, permanent branding in your photos is key.

Trademark and Brand Name Don’t Match Exactly

Even tiny differences in spelling, spacing, or punctuation can create issues during verification. The trademark you submit should match the name on your products word for word.

Outdated Product Images

Sellers sometimes apply with old photos that no longer match current packaging. If the images don’t consistently show the brand name or logo, Amazon may ask for updated proof. Fresh, accurate visuals help avoid unnecessary back-and-forth.

Trademark Not Valid in the Regions You Plan to Sell

Brand Registry enrollment is tied to the country where your trademark is registered. If you’re expanding internationally, make sure your trademark covers those regions, or you may run into limits when enrolling.

A quick review of these details makes the verification process far less stressful and helps your brand get approved without extra delays.


Conclusion

Amazon Brand Registry gives brand owners a straightforward way to protect their intellectual property while offering tools that make it easier to build a strong presence in the Amazon store. Once you’re enrolled, you gain access to safeguards that help prevent inaccurate listings, misuse of your brand name, and other issues that slow down growth. At the same time, features like A+ Content, Brand Analytics, and customer engagement tools give you clearer insight into what shoppers respond to and how your catalog performs over time.

Because the program is free to join, the main effort is making sure your trademark and branding are in order. For many sellers, that step becomes a turning point. With the protective layer in place and better visibility into customer behavior, it becomes easier to focus on expanding your catalog, improving your strategy, and building a brand that stands out in a competitive marketplace.


FAQ

Do you need a trademark to enroll?

Yes. You must have either a registered trademark or a pending application.

Can you sell on Amazon without Brand Registry?

Yes, but you won’t have access to the protections and brand-building tools Brand Registry provides.

Where do you enroll a brand?

Visit the Brand Registry page, sign in, and follow the enrollment steps.

Can you register a brand you don’t own?

No. Only the trademark owner can complete enrollment.

Does Brand Registry boost product visibility?

Indirectly, yes. Once enrolled, you can use tools like A+ Content, Amazon Stores, and Brand Analytics that can help improve visibility and conversion.

What Ecommerce Shipping Means Today

Shipping plays a huge role in how well an ecommerce business runs. It affects what customers think of your brand and how much it costs you to get each order out the door. As online competition grows, a shipping process that’s quick, dependable, and easy to manage can give you an edge when you’re trying to win new customers or keep existing ones coming back.

This guide walks through the essentials of ecommerce shipping, including different shipping methods, timelines, carriers, and practical tips you can use as your store grows.


What Ecommerce Shipping Includes

Once a customer places an order, a whole series of steps follow before the package arrives on their doorstep. In most ecommerce businesses, the process looks something like this:

  1. A customer submits an order.
  2. You verify inventory.
  3. Order details are checked for accuracy.
  4. The product is picked, packed, and made ready for shipment.
  5. The carrier receives the package and handles the delivery.

If you’re just starting out, you might be packaging orders in your living room and dropping them at your local carrier. But as sales increase – especially if you sell multiple product types, you’ll likely outgrow that setup. At some point, reviewing and improving your shipping workflow becomes essential. If you’re spending more time packing boxes than growing the business, it may be time to bring in extra help or explore outsourcing fulfillment.

Fulfillment vs. Shipping

People often mix these two terms up, so here’s a simple way to think about them:

  • Fulfillment includes everything that happens after an order is placed: picking, packing, labeling, and preparing shipments.
  • Shipping begins only when the packaged order is officially passed to a carrier.


Where WisePPC Fits Into Your Shipping Strategy

At WisePPC, we know that shipping isn’t just an operational step – it’s a major part of how customers experience your brand and how efficiently your business runs. When delivery times slip or costs start rising, it affects everything from conversion rates to repeat purchases. That’s why we built our analytics platform to give you a complete, real-time view of the factors that shape your shipping performance. We pull together your advertising, sales, and operational data so you can see exactly what’s working, where money is being wasted, and how changes in shipping impact your bottom line.

As your business scales, having this level of visibility becomes even more important. With WisePPC, you can track long-term trends, compare performance across marketplaces, and identify issues before they affect customer satisfaction. Whether you manage a small catalog or thousands of SKUs, our tools help you make confident, data-backed decisions that support growth. The result is a smarter, more predictable shipping strategy, and a stronger marketplace presence powered by real insights instead of guesswork.


Understanding Ecommerce Shipping Timelines

Online shoppers expect to know how long delivery will take, and they often choose sellers based on whether the timing matches their needs. Here are some of the most common delivery speeds:

  • Standard (3–7 days): The most budget-friendly option. Good for customers who don’t mind waiting a few extra days.
  • Two-day delivery: Now considered a baseline expectation for many shoppers who want fast delivery without paying for overnight service.
  • Same-day delivery: Useful for items like groceries or essentials. This requires inventory to be held close to the customer or a highly efficient local operation.
  • Overnight delivery: Often used for last-minute gifts or urgent purchases. Usually the most expensive option.
  • Expedited shipping: Any delivery faster than standard but not necessarily tied to a strict timeline. Depends on the service level offered by your carrier.


Which Shipping Company Works Best for Ecommerce?

There’s no universal “best” carrier – the right choice depends on your budget, product weight and size, destination, and how quickly packages need to arrive. Some commonly used shipping partners include:

  • UPS: Covers more than 200 countries and offers options ranging from UPS Ground (1–5 days) to UPS Next Day Air.
  • Amazon Shipping: Lets you use Amazon’s transportation network to deliver orders from Amazon or other sales channels. They pick up and deliver seven days a week, with no extra weekend or residential fees.
  • FedEx: Known for flexible delivery timelines and strong international coverage across 220+ countries and territories.
  • USPS: A cost-effective option for domestic and international shipping, with perks like flat-rate boxes and free package pickup.


Shipping Through Amazon

Amazon offers several delivery options for both shoppers and sellers. Some are exclusive to Prime members, while others apply to all buyers. These include:

  • Two-Day Delivery: Fast, free shipping on millions of Prime-eligible items.
  • One-Day Delivery: More than 15 million items available in just one day for Prime members.
  • Same-Day Delivery: Offered in select areas for eligible items; availability may tighten during peak seasons.
  • No-Rush Shipping: Slower delivery in exchange for rewards.
  • Subscribe & Save: Automatic recurring deliveries with flexible scheduling and discounts.
  • Free Shipping by Amazon: Available when customers meet minimum purchase requirements.
  • Domestic Expedited Shipping: Faster delivery for an added fee.
  • Standard Delivery: Arrives within 4–5 business days.


Shipping Methods for Ecommerce Businesses

There are several ways to get your products to customers, and each method has benefits depending on your setup:

There’s no single “best” way to ship products – most ecommerce brands end up using a mix of methods as they grow, test new product lines, or expand into new regions. Below are the most common approaches, along with what makes each one helpful (or challenging) depending on your setup.

1. Dropshipping

Dropshipping transfers almost the entire fulfillment workload to a supplier. They store the inventory, pack each order, and ship directly to your customer. It’s appealing for newer sellers because it removes the need for warehousing or upfront bulk inventory purchases.

The trade-off is control, since you don’t physically handle the product, you’re relying on the supplier to pack carefully, ship on time, and maintain quality standards. If they slip up, you’re the one dealing with unhappy customers.

2. Direct-from-Warehouse Shipping

Sometimes called “direct shipping,” this method sends products straight from the supplier or manufacturer to the customer. It’s similar to dropshipping, but usually used when you already have a strong relationship with your supplier or a predictable product lineup.
It can reduce handling time and storage costs, though you’ll still need to coordinate inventory levels and make sure your supplier is prepared to fulfill consistently.

3. Third-Party Shipping (3PL)

A third-party logistics provider manages storage, packing, and shipping for you. It’s a popular choice for ecommerce sellers who want to scale without running a warehouse.

You pay for the service, but you gain professional handling, faster turnaround times, and predictable workflows. The downside is that pricing structures vary, so you’ll want to compare storage, pick-and-pack, and shipping fees before committing.

4. Last-Mile Carriers

In this approach, one carrier (like FedEx or UPS) picks up your package and hands it off to another carrier,  often USPS, for the final leg of delivery. It’s a cost-saving strategy for lightweight or low-margin items. The drawback is speed; because more parties are involved, delivery timelines can stretch out, especially in rural areas.

5. Automated Shipping

Automation systems create labels, assign carriers, and in some cases even trigger fulfillment without any manual input. This reduces errors, keeps orders moving during peak seasons, and shrinks the time between receiving an order and getting it out the door.
Automation doesn’t replace carriers, but it simplifies the logistical part of the workflow. It works particularly well for shops with steady order volume or multiple sales channels.

6. Eco-Friendly Shipping

More brands are turning to sustainable shipping options – recycled boxes, biodegradable packing materials, and optimized delivery routes. Customers increasingly appreciate environmentally responsible choices, and in some cases, eco-friendly packaging can even reduce costs by using lighter or more efficient materials. The challenge is balancing sustainability with durability so products still arrive safely.

7. Hybrid Shipping

Most ecommerce businesses end up here. You might handle some orders internally, outsource others to a fulfillment partner, use dropshipping for certain product lines, or rely on different carriers for domestic vs. international shipments. A hybrid approach lets you adapt as your business grows, but it also requires clear tracking and good communication so nothing slips through the cracks.

8. Freight Shipping

Freight is the go-to option for anything oversized or heavy – usually anything over 150 pounds or products with large dimensions.

It’s commonly used by brands shipping bulk inventory to warehouses, or by sellers whose items simply can’t ship through standard parcel carriers. Freight requires more planning, but it often ends up being more cost-effective for large shipments.

Cost-Based Shipping Approaches

You can also organize your shipping options around pricing:

  • Flat-rate shipping: One fixed fee, or tiered fixed fees based on weight or price brackets.
  • Free shipping: Costs are rolled into product pricing or conditional (“free shipping over $X”).
  • Real-time carrier rates: Customers see exact shipping prices based on live data from the carrier.


Why Work With a Fulfillment Provider?

Working with a fulfillment provider can take a significant amount of pressure off your day-to-day operations. Instead of managing inventory, printing labels, and dropping off packages yourself, you send your products to a dedicated warehouse and let their team handle the packing and shipping whenever an order comes in. Providers like Fulfillment by Amazon (FBA) are built to manage these processes at scale, which means they can often move orders faster and more efficiently than an individual seller could on their own.

Because fulfillment providers ship such high volumes, they typically secure better carrier rates, which can bring your shipping costs down. Their established workflows also reduce the likelihood of delays or missed shipments, and many offer multiple warehouse locations so inventory is stored closer to customers. This cuts delivery timelines and makes fast shipping more realistic, even if you’re a smaller brand. Offloading fulfillment also gives you back hours of time to focus on tasks that actually grow your business, like product development, marketing, or improving customer experience.

For businesses planning to expand into new regions, fulfillment partners can make that transition smoother. With products stored across different facilities, you can reach customers in new areas without setting up your own physical infrastructure. The trade-off is cost: storage, handling, and service fees vary by provider, so it’s important to understand how those expenses fit into your overall budget before committing.


Domestic vs. International Shipping

Shipping within your own country is simpler and generally cheaper. International shipping introduces more variables: customs forms, fees, taxes, and regulations.

If you plan to ship internationally, here’s what to keep in mind:

  • Identify key countries: Knowing where you expect to ship helps you choose the right carrier.
  • Pick a reliable international carrier: Look for tracking, multiple shipping speeds, and strong customer feedback.
  • Understand fees: Costs vary widely depending on weight, size, speed, and destination.
  • Know the taxes: Duties, VAT, GST – these charges vary by country and can change the total cost significantly.
  • Fill out customs paperwork correctly: Missing or inaccurate information can delay or block shipments.
  • Follow restrictions: Some countries ban certain items, and ignoring those rules can result in fines.


Shipping Costs to Include in Your Budget

Before you map out your shipping strategy, it helps to understand the different costs that shape the final price of getting an order to a customer. Here’s a simple breakdown:

Cost Category What It Covers
Carrier fees Postage, delivery charges, and any rates tied to weight, size, or destination.
Packaging materials Boxes, mailers, tape, protective fillers, and any custom or branded packaging you use.
Fulfillment Labor or service fees for picking, packing, and preparing orders, whether in-house or through a provider.
Overhead Warehouse rent, shipping software, tools, equipment, and other operational expenses.
Insurance Protection against lost, stolen, or damaged packages during transit.
Extras Add-ons like signature confirmation, advanced tracking, or photographic proof of delivery.


If you’re planning to ship a large number of packages, it’s worth asking carriers about bulk pricing. Many are willing to offer better rates when you commit to consistent volume, which can help reduce overall shipping costs as you scale.


How to Ship Orders in Simple Steps

Once you’re set up to start shipping consistently, the process becomes a routine you can refine over time. Here’s a closer look at each step.

1. Choose the Right Packaging

Good packaging does two jobs: it protects your product and keeps shipping costs reasonable. Too much padding or an oversized box can push the package into a higher price category, but too little protection risks damage. Try out a few combinations of boxes, inserts, and materials to see what holds up best during transit. It’s worth treating this as testing rather than guessing.

2. Add Any Extras

Small touches can go a long way toward building customer loyalty. A thank-you card, a business card, or even a simple note with care instructions helps the order feel more personal. If you offer promotions or discount codes, slipping one into the package can also encourage customers to come back for another purchase.

3. Pack the Order Securely

Once everything is ready to go inside the box, place your items so they can’t shift around. Use enough filler to cushion the product but avoid overpacking. The goal is a tight, tidy fit that keeps the contents stable even if the package gets jostled during shipping. If you’re sending fragile items, consider doing a few “shake tests” to make sure nothing rattles.

4. Print and Attach the Shipping Label

Your shipping label should be clear, easy to scan, and placed on the top panel of the package. Double-check that both the sender and recipient information are correct – small typos can lead to unnecessary delays. If you’re working with a fulfillment provider, they’ll apply labels for you, but it’s still a good idea to understand what the process looks like.

5. Hand Off the Package to Your Carrier

You can drop your package off at a local carrier location or schedule a pickup if your carrier offers that service. Pickup can be a major time-saver once order volume increases. Make sure you keep your tracking number handy; customers almost always want updates, and tracking helps you stay aware of any delays or issues.

6. Notify Your Customer

As soon as the package is on its way, send the tracking information to your customer. Most ecommerce platforms automate these notifications, but even an automated message adds transparency and reduces the chances of support inquiries. Customers appreciate updates – it reassures them that their order is moving and gives them a clearer idea of when it will arrive.


Final Thoughts

Shipping evolves as your business grows. What works when you’re processing a few orders a week may not work when you’re handling dozens or hundreds per day. The key is to stay flexible and adjust your process as you learn what works best for your products, customers, and budget.

Once you’re familiar with the basics, you’ll be able to anticipate your shipping needs, streamline your operations, and create a smoother experience from checkout to delivery. A thoughtful shipping strategy can help you keep customers happy and support steady growth over time.


FAQ

What exactly does ecommerce shipping include?

Ecommerce shipping covers everything involved in getting a product from your business to your customer. That includes packing the order, choosing a carrier, labeling the box, transferring it to the carrier, and making sure it arrives on time. It’s one part of the broader fulfillment process, which also includes picking and preparing orders before they leave the warehouse.

How do I choose the right shipping carrier?

The best carrier for you depends on your product size, delivery speed, destination, and budget. Some businesses prioritize cost, while others need faster delivery or strong international options. Many sellers test a few carriers before settling on the one that consistently delivers the right mix of price and reliability.

Is two-day shipping required to stay competitive?

Not always, but it can make a noticeable difference. Customers increasingly expect fast delivery, especially for everyday products. If two-day shipping isn’t realistic for your business, look for ways to speed up processing times or store inventory closer to customers to shorten transit distances.

What’s the difference between fulfillment and shipping?

Fulfillment includes everything that happens after an order is placed – picking the product, packing it, labeling it, and preparing it for shipment. Shipping is the final handoff to a carrier, who then transports and delivers the package.

Should I offer free shipping to customers?

Free shipping can increase conversions, but it isn’t free for your business. Some sellers build the cost into product pricing, while others offer free shipping only after customers reach a certain order value. The best approach depends on your margins and how sensitive your audience is to shipping fees.

B2B Ecommerce: What It Is, Why It Matters, and How to Build Your Strategy in 2026

B2B ecommerce has grown into a core channel for companies that sell products or services to other businesses. What used to rely heavily on calls, catalogs, and in-person orders has shifted toward online stores, self-service portals, and automated systems. The change hasn’t been overnight, but it’s reshaped how many organizations buy, plan, and restock.

This guide breaks down the main concepts, different models, and the practical steps companies take when they start selling B2B online. You’ll also find strategies you can use to attract business buyers and improve the entire purchasing experience.


What B2B Ecommerce Means Today

At its simplest, B2B ecommerce refers to selling goods or services from one business to another through digital channels. Instead of placing orders by phone or email, buyers use online catalogs, pricing pages, or custom portals to browse, compare, and buy.

The idea is the same as traditional B2B sales, but the tools and expectations have changed. Businesses want faster ordering, clearer information, and the ability to purchase anytime – not only during office hours.


Types of B2B Ecommerce

Several models fall under the B2B ecommerce umbrella, each serving a different type of buyer relationship.

  1. Business-to-Business-to-Consumer (B2B2C): A hybrid model where two companies work together to deliver goods or services to the end consumer. One might produce the item while the other handles fulfillment or customer-facing operations.
  2. Wholesale: A wholesaler buys or produces items in bulk and sells them to retailers at discounted rates. The retailer then sells those same products to consumers at standard retail pricing.
  3. Manufacturers: Manufacturers use raw materials and machinery to create products that are sold in large quantities to wholesalers, distributors, or other manufacturers.
  4. Distributors: Distributors serve as the link between product makers and the businesses that need those products for resale or operations.


Common Examples of B2B Ecommerce

Many industries use online storefronts or purchasing systems to simplify how businesses place orders. A few everyday examples include:

  • An office supply company offering corporate accounts so teams can reorder essentials whenever needed
  • An equipment manufacturer with an online portal where maintenance departments schedule part replacements
  • A furniture wholesaler giving design studios access to product customization and volume ordering
  • A software provider offering self-service licensing and subscription management for business clients
  • A commercial cleaning supplier selling directly to hotels, clinics, and gyms through a simple online catalog

The common thread is convenience. These companies use digital tools to make ordering faster, information easier to find, and repeat purchasing nearly effortless.


Where WisePPC Helps B2B Teams Work Smarter

When we talk to teams exploring B2B ecommerce, one theme comes up again and again – the data behind their decisions is often scattered, delayed, or difficult to translate into clear next steps. At WisePPC, we built our toolkit to take some of that weight off their shoulders. Instead of juggling spreadsheets, ad dashboards, and marketplace reports, sellers get one place where their performance actually makes sense. It lets them see how their products move, where demand is shifting, and which campaigns are quietly shaping their B2B sales pipeline.

We also try to simplify the routine work that eats up hours each week. Bulk updates, real-time filtering, historical trend charts, and on-the-spot editing were added because teams kept telling us how much time disappears into the small tasks. Our goal isn’t to replace anyone’s workflow – it’s to make the everyday steps quicker, clearer, and less frustrating. When sellers can track what’s happening across marketplaces and react without digging through multiple tools, their B2B strategies usually start falling into place on their own.


6 Benefits of B2B Ecommerce

Whether you already serve business buyers or you’re shifting from consumer-focused sales, moving B2B transactions online brings noticeable advantages.

1. Access to New Business Customers

Traditional B2B selling tends to rely on existing relationships, trade shows, and outreach. Ecommerce widens that circle. Buyers searching online can discover your products even if they’re across the country – or across the world. If you already sell B2C, your infrastructure may only need a few adjustments to support business orders as well.

2. Smoother and More Efficient Operations

Digitizing B2B sales often removes the most time-consuming parts of the process:

  • Orders enter automatically instead of through calls or emails
  • Inventory updates in real time, reducing manual adjustments
  • Billing and invoicing run on their own, especially when connected to accounting tools
  • Buyers manage their accounts, reorders, and documentation without waiting on a representative

The result is a shorter sales cycle and fewer administrative bottlenecks.

3. A More Convenient Purchasing Experience

Business buyers want the same ease they experience when shopping personally: quick search, clear details, easy checkout, and reliable delivery.

A B2B ecommerce store lets them:

  • Search for exact items
  • View specifications, pricing, and availability
  • Place orders anytime
  • Reorder in one click or set subscription deliveries
  • Track shipments and download invoices as needed

You can also offer features tailored for business needs, like custom pricing, quantity breaks, credit-based payments, and procurement approvals.

4. More Insight into Buying Behavior

Selling online gives you visibility into what your customers browse, how often they order, and which items generate the most interest. These insights help refine product planning, marketing efforts, inventory management, and even pricing.

5. Lower Costs Across the Business

Moving B2B sales online can reduce expenses in several ways:

  • Less manual order entry
  • Fewer errors and returns
  • Less time spent on repetitive customer service tasks
  • Lower printing and mailing costs
  • Better inventory control that reduces stockouts and excess storage
  • Sales teams free to focus on large accounts rather than routine ordering

6. Better Collaboration Between Teams

When your sales happen online, different teams inside your company gain access to the same real-time information. Sales, operations, finance, and customer support all see the same order history, stock levels, and delivery updates. It cuts down on miscommunication and makes it easier to resolve issues quickly.

A shared system also helps everyone understand customer patterns. Sales can spot opportunities, marketing can refine messaging, and operations can prepare for demand. Instead of running separate spreadsheets or chasing answers through email threads, everyone works from one reliable source of truth.


Before You Get Started: A Quick Self-Check

Before stepping into B2B ecommerce, it’s worth taking a moment to look at how your business currently operates. Think about your catalog, how complex your pricing is, and how often customers come back with the same types of orders. If you’re already spending a lot of time answering repeat questions, sending quotes, or processing manual purchases, that’s usually a sign your buyers would appreciate a more streamlined way to order.

A quick readiness check doesn’t need to be formal. It simply helps you understand what your B2B setup should actually support and where you might need small adjustments before launching. Going in with a clear picture of your starting point makes the rest of the process easier and prevents issues later on.


Three Steps to Start Selling B2B Online

Ready to build a B2B ecommerce presence? The process is usually more straightforward than it seems.

Step 1: Shape Your B2B Ecommerce Approach

Start by clarifying:

  • Who your business buyers are: Understand their industries, order sizes, needs, and decision processes.
  • How you plan to sell: You can use your own website, join a marketplace, or combine both. Each option has different strengths – your audience and product type usually guide the decision.

Step 2: Build Your Online Store or Portal

A simple setup checklist might look like this:

  1. Choose an ecommerce platform that supports B2B features such as custom pricing, bulk discounts, and invoicing.
  2. Prepare your product catalog with strong descriptions, clear images, and accurate data.
  3. Design the storefront in a way that feels intuitive and aligns with your brand.
  4. Set up payments, tax settings, and shipping rules.
  5. Run test orders to make sure everything works the way customers expect.

Launching is just the beginning – most businesses refine their store continuously as they learn how buyers interact with it.

Quick Tip: Detailed product specs and volume pricing make a big difference for business buyers who need clarity before placing bulk orders.

Step 3: Promote Your B2B Offering

Once your store is live, focus on visibility.

  • Share industry-specific tips and content on social platforms
  • Build segmented email lists for targeted outreach
  • Use paid ads to reach specific business audiences
  • Publish useful resources that draw the right customers to your store

The goal is not only to attract new buyers, but also to remind existing ones that ordering from you is now easier and faster.


B2B Ecommerce Strategies for Sustainable Growth

A strong B2B operation doesn’t run on a store alone. Even with a solid platform in place, you still need habits and processes that keep your momentum going. These strategies help you stay focused on what actually moves the needle.

Identify Trends and Opportunities

Spend some time with your long-term data instead of only reacting to what happened this week. Patterns usually don’t show up overnight, but when they do, they reveal which products are picking up interest and which customer groups might be worth nurturing. It’s a simple way to spot opportunities before they turn into crowded markets.

Understand Your Audience

Getting to know your buyers isn’t a one-time task. Their goals shift, their workloads change, and the problems they’re trying to solve evolve over time. The clearer you are about what they’re dealing with, the easier it becomes to shape your messaging, choose the right features to highlight, and avoid offering things they don’t actually need.

Offer Incentives

Business buyers appreciate a good deal just as much as consumers, especially when the purchase involves volume or frequent reorders. Small nudges like bulk discounts, first-order perks, or free shipping above a certain amount can help hesitant buyers commit. It’s not about running constant promotions – just giving people a little extra reason to try you out.

Refine Your Marketing

Your campaigns will rarely be perfect on the first try. Look at what’s working, what’s costing too much, and what’s getting ignored altogether. Performance data helps you shift budget to the channels that actually bring in steady business buyers. Over time, this makes your marketing feel less like guesswork and more like a well-tuned system.

Optimize for Search Engines

When businesses search for products in your category, you want to show up where they’ll actually see you. Clear descriptions, relevant keywords, and useful content help search engines understand who you serve. SEO takes some patience, but it’s one of the most reliable ways to attract steady B2B traffic without paying for every click.


Building a Smooth Post-Purchase Experience

A lot of attention goes into attracting business buyers and helping them place that first order, but what happens afterward often matters just as much. The post-purchase stage is where buyers decide whether your store is a one-time stop or a dependable partner they can rely on. When this part feels simple and predictable, it builds trust without you having to push for it.

Clear communication makes the biggest difference. Buyers want to know where their order stands, when it will arrive, and what to expect if anything changes. Straightforward tracking updates, easy access to order history, and well-organized invoices can save everyone from unnecessary back-and-forth emails. The same goes for returns and replacements – the smoother you make those moments, the more confident buyers feel ordering from you again.

Repeat purchases are another part of the equation. Many B2B orders follow patterns, so giving buyers quick reorder tools or letting them save their preferred items helps them move through the process without thinking twice. When routine tasks feel effortless, the relationship grows naturally. The goal isn’t to impress buyers with big gestures, it’s to make the everyday steps so simple that they barely notice the work happening behind the scenes.


Wrapping It Up

B2B ecommerce has become one of the most reliable ways for companies to reach business buyers, simplify operations, and build a more predictable sales engine. What used to require long email chains or repeated phone calls now happens through clear product pages, real-time inventory, and ordering systems that run day and night. The shift isn’t just about convenience – it changes how teams work, how relationships grow, and how businesses plan for the future.

If you’re exploring B2B ecommerce in 2026, the path forward doesn’t have to feel overwhelming. Start by understanding what your buyers expect, build a store that supports how they already prefer to purchase, and adjust as you learn. With the right pieces in place, online buying becomes more than a channel, it becomes the dependable backbone of your business. Most companies discover that once the system is up and running, the real work is simply fine-tuning it and letting it scale.


FAQs

What exactly counts as B2B ecommerce?

B2B ecommerce refers to businesses selling goods or services to other businesses through online stores, portals, or digital marketplaces. Buyers can browse, compare, and purchase without relying on manual order-taking.

Is B2B ecommerce only for large companies?

Not at all. Small and mid-sized businesses are often the ones who benefit most, since ecommerce reduces time spent on manual tasks and makes it easier to reach new customers without expanding a full sales team.

Do I need a complex website to sell B2B online?

No. You can start with a straightforward store that includes clear product information, accurate pricing, and reliable ordering. You can always add advanced features, like custom catalogs or approval workflows, as you grow.

How is B2B ecommerce different from B2C ecommerce?

The buying process is more structured. Business customers often need quotes, bulk pricing, account-level history, or payment terms. The experience is more functional than emotional, and consistency matters more than impulse.

What features do business buyers expect?

They typically look for real-time availability, transparent pricing, simple reordering, clear delivery timelines, and the ability to manage their account without waiting for someone to respond manually.

Make Your Products the First Choice With the Amazon Featured Offer

When several sellers list the same item in the Amazon store, all of those offers get grouped on one product page. It keeps things simpler for shoppers and helps them compare without bouncing between multiple listings. On many of these pages, one offer gets highlighted – the one sitting next to the Buy Now and Add to Cart buttons. That’s the Featured Offer, previously known as the Buy Box.

Landing in that spot often gives a product a noticeable lift. Customers naturally gravitate toward the option that’s already positioned as the primary choice. If they want to explore alternatives, they still can, but the Featured Offer usually gets the first click.


Why Amazon Uses the Term “Featured Offer”

For longtime sellers, the Featured Offer may feel like a rebrand of the Buy Box – and that’s essentially what it is. Amazon has experimented with different labeling to make the concept more intuitive for sellers who aren’t familiar with older terminology.

The idea is the same: one offer gets highlighted based on price, delivery speed, customer experience, and account health. Using “Featured Offer” simply communicates to newer sellers that Amazon is spotlighting one option because it offers the best overall buying experience at that moment.


What Makes an Offer Eligible

Eligibility varies a bit by category, but most sellers need to meet the same core requirements:

  • A Professional selling account in good standing
  • Products listed as “New”
  • Pricing that remains competitive with major retailers outside Amazon

These set the foundation. But eligibility alone doesn’t guarantee that your offer will appear in that top placement.


How We Help Sellers Compete for the Featured Offer

At WisePPC, we’ve seen how quickly the Featured Offer can shift, sometimes hour by hour, and how hard it is for sellers to keep up without clear, dependable data. That’s why we built a platform that gives you real visibility into the signals Amazon pays attention to, from pricing movements to delivery promises to sudden changes in competitive pressure. Instead of digging through scattered reports, you get a clean, real-time view of what’s helping your offer rise and what’s holding it back, supported by years of historical data Amazon doesn’t store.

We also designed our tools to move just as fast as the marketplace. With automated insights, advanced filtering, bulk updates, and AI-assisted campaign adjustments, you can react before a missed opportunity turns into a lost Featured Offer slot. And because we’re an Amazon Ads Verified Partner, everything we build follows Amazon’s best practices from the inside out. Our goal is simple: help sellers stay competitive, scale with confidence, and win the placement that drives the majority of conversions on every product detail page.


How To Increase Your Chances of Becoming the Featured Offer

There isn’t a single formula, but several factors consistently help sellers move closer to that placement.

1. Price Products Competitively

Pricing carries a lot of weight, and Amazon compares yours to similar listings both inside and outside the platform. To stay competitive without constantly checking manually, sellers often lean on built-in tools:

  • Manage All Inventory: Helps you see if your offer currently holds the Featured Offer spot. It also shows external reference prices and the lowest price inside the Amazon store.
  • Pricing Health: Lists offers that aren’t eligible and explains why. It’s a quick way to identify where a price adjustment might help.
  • Automate Pricing: Lets you set rules that adjust prices automatically, keeping your offer competitive any time of day.

Remember, Amazon evaluates the total price – item plus shipping.

2. Offer Fast and Affordable Shipping

Faster or free shipping tends to improve your chances immediately. Some sellers handle this through their own fulfillment process, while others rely on Amazon’s network. Either option can work as long as the delivery experience is strong.

3. Maintain Excellent Customer Service Metrics

If you fulfill orders yourself, Amazon pays close attention to how reliably you handle them. A few key metrics matter most:

  • Order Defect Rate: target under 1 percent
  • Late Shipment Rate: keep under 4 percent
  • Cancellation Rate: stay below 2.5 percent
  • Valid Tracking Rate: above 95 percent

You can keep an eye on all of these in your Account Health dashboard. If managing service becomes too demanding, some sellers switch part or all of their fulfillment to Amazon to help keep metrics stable.

4. Keep Inventory Levels Steady

Running out of stock is one of the fastest ways to lose Featured Offer visibility. If you anticipate higher demand: seasonal spikes, promotions, or trending products, make sure you have enough on hand. Inventory levels can be tracked anytime in Seller Central under Manage All Inventory.

5. Optimize Your Product Listings

Even strong offers get lost if the listing itself isn’t clear. Clean titles, accurate descriptions, and helpful details can improve visibility in search results and indirectly support your chances of being selected as the Featured Offer.


When the Featured Offer Is Suppressed

Sometimes there’s no Featured Offer at all. Instead of the Buy Now button, the page shows “See All Buying Options.” That usually means:

  • The product’s price is considered too high
  • Amazon can’t determine a “fair” price for the category
  • Sellers have inconsistent delivery performance
  • Inventory is too low
  • Amazon’s algorithm is withholding the Buy Box due to product or policy concerns

Suppression can impact visibility dramatically since many shoppers won’t click through additional screens to find the price. This is why sellers pay close attention to the Featured Offer Percentage – the percentage of page views where their offer is the one customers actually see.


Why Different Customers See Different Featured Offers

A common point of confusion is thinking the Featured Offer is fixed. It’s not. Two shoppers looking at the same product may see entirely different sellers featured.

That’s because Amazon tailors the Featured Offer based on variables like:

  • Buyer location
  • Delivery speed to that specific address
  • Whether the buyer is a Prime member
  • Past browsing or purchasing behavior
  • Account type (Business vs personal)
  • Real-time inventory levels in nearby fulfillment centers

For example, a merchant-fulfilled seller in Ohio might win the Featured Offer for customers in surrounding states because they can deliver faster locally. But that same listing may show a different Featured Offer for customers on the West Coast.

This dynamic nature explains why Seller Central may show you as the Featured Offer, but browsing the product page from another address reveals a different seller in the Buy Box.


Conclusion

The featured offer isn’t something you win once and forget about. It shifts with pricing, delivery speed, and how reliable your account looks over time. When those pieces stay steady, your offer becomes the one customers reach for first. Even small improvements in stock levels, listing quality, or fulfillment speed can move you closer to that spot. It’s competitive, but once you understand how it works, you can adjust your approach and earn that visibility more consistently.


Frequently Asked Questions

What is the Amazon Featured Offer?

It’s the main offer shown on a product page next to the Buy Now and Add to Cart buttons. Amazon surfaces the option that provides the best overall value and delivery promise at that moment.

Is the Featured Offer the same as the Buy Box?

Yes. It’s essentially a newer label for the same placement sellers used to call the Buy Box.

Why does the Featured Offer change from one shopper to another?

Amazon personalizes it based on the customer’s location, delivery speed, account type, and sometimes browsing behavior. Two people can see different sellers featured on the same item.

Why is the Featured Offer missing from my listing?

If Amazon suppresses it, shoppers will only see “See all buying options.” This can happen due to high pricing, low stock, weak metrics, or category rules.

Does it cost money to win the Featured Offer?

No. You just need a professional selling plan and performance metrics that meet Amazon’s eligibility standards.

Ecommerce Automation: 12 Tasks You Can Hand Off to Technology

Running an online store usually starts with excitement, but it doesn’t take long before the repetitive work piles up. Updating listings, checking stock, replying to questions, adjusting prices, sending order updates, trying to keep track of what’s selling and what isn’t – it can easily eat an entire day before you even look at bigger strategy work.

That’s where automation becomes less of a nice idea and more of a relief. With the right setup, many of the tasks you handle manually can run quietly in the background, giving you both time and cleaner workflows. Below is a breakdown of common ecommerce tasks you can automate, along with examples of tools inside the Amazon ecosystem that can help.


WisePPC: Automating the Insights and Decisions Behind Marketplace Growth

At WisePPC, we built our platform around one idea: most ecommerce teams spend too much time wrestling with data instead of using it. Manual reporting, scattered dashboards, and guesswork slow everything down. By automating analytics and key parts of campaign management, we help sellers move faster and understand their performance without digging through spreadsheets.

Our system pulls sales and advertising data into one place, refreshes it in real time, and highlights anything that needs attention. You can spot shifts in demand, review long-term trends, adjust bids or budgets in bulk, and see how ads influence organic sales. Instead of micromanaging campaigns, you get clear signals about opportunities, wasted spend, and areas worth scaling.

Automation is what makes the entire workflow feel lighter. We store years of historical data automatically, so seasonality and performance patterns are easy to track. Whether you manage a small catalog or thousands of SKUs, our goal is to handle the heavy analytical work behind the scenes so your team can focus on growth, not maintenance.


1. Generate Product Listing Content

Good product listings work like your digital storefront. Descriptions, titles, and attributes shape how customers understand what you sell. Writing everything from scratch, though, can be exhausting if you publish often.

If you sell in the Amazon store, you can use built-in generative AI tools to produce titles, descriptions, and even structured attributes from a few words or an image. You still guide the content, but the heavy lifting happens automatically.


2. Keep Prices Up to Date

Manually tracking competitors and adjusting prices can pull your attention away from everything else. Automated pricing tools solve this by updating prices around the clock, based on rules you set.

Amazon’s Automate Pricing helps sellers keep listings competitive without constant monitoring, increasing the chances of appearing as the Featured Offer.

Tip: Brand Registry unlocks automated protections and additional tools if you’re building a brand inside the Amazon store.


3. Tighten Up Shipping and Delivery Times

Shipping often hides a lot of tiny decisions that slow teams down. If you fulfill your own Amazon orders, Shipping Settings Automation can calculate realistic transit times using your location, preferred carriers, and customer delivery zones. Thanks to more accurate delivery estimates, you avoid disappointing customers and guessing delivery windows.


4. Run Fulfillment Tasks Automatically

Order updates, label printing, customer notifications – these are all small but necessary steps. A simple automation system can send order confirmations, shipping notices, and delivery updates without you lifting a finger. It seems minor until you realize how much time it frees each day.

If you’d rather outsource fulfillment entirely, Fulfillment by Amazon (FBA) bundles packing, shipping, returns, and customer support into one service. It becomes even more powerful when used as part of Supply Chain by Amazon.


5. Keep an Eye on Inventory

Inventory management walks a fine line. Run out of stock and sales stop; overstock and storage costs climb. Automation helps spot low inventory and plan replenishment before issues appear. Amazon Warehousing and Distribution offers bulk storage and restocking support for sellers who want a smoother, low-cost way to stay stocked.


6. Bring Automation Into Your Marketing Workflows

Staying in touch with your audience takes effort. Email sequences, social posts, promos – they all need timing and consistency. A good marketing automation platform can segment audiences, send campaigns at the right moment, and keep communication steady without the daily manual hustle.

This applies to everything from newsletters to social ad reminders.


7. Improve Customer Service Without Slowing Down

A growing store means more questions to answer. AI chat tools and simple automated responses can step in to reply to common questions, guide customers, assist with returns, or confirm that support has received their message.

Even a warm auto-reply helps customers feel acknowledged until someone can dig into the full request.


8. Manage Customer Reviews More Efficiently

Reviews shape trust, and managing them manually becomes difficult as your catalog grows. Brands enrolled in Brand Registry can use the Customer Reviews tool to track lower-rated reviews quickly and send courtesy messages or requests for additional details using built-in templates.

The Voice of the Customer dashboard in Seller Central also helps highlight trends, potential product issues, and places where listings might need improvement.


9. Strengthen Your Risk Management

Fraud detection is one area where automation truly shines. AI tools can flag unusual orders, risky IP addresses, suspicious payment activity, and other signs of fraud before they become bigger problems.

Amazon sellers can also use Report a Violation to monitor potential misuse of trademarks, copyrights, or patents. Project Zero combines automated protections with serialization tools and lets eligible sellers remove counterfeit listings immediately.


10. Automate Your Advertising Work

Running ads by hand can become overwhelming as your catalog grows. Sponsored Products ads use a cost-per-click model to place products in relevant search results. You can pick keywords manually or let Amazon handle targeting based on your goals.

Brand Registry unlocks Sponsored Display, which uses machine learning to show ads across Amazon and a wider network of sites and apps.

Tip: If customers reorder the same items regularly, programs like Subscribe and Save can automate future purchases and give shoppers predictable discounts.


11. Get Clearer Insights Without Manual Reporting

Metrics like clicks, conversions, revenue, and cart-adds matter, but generating reports manually takes time. Automated reporting tools help surface trends early, highlight performance shifts, and reveal what’s working and what isn’t.

Brands enrolled in Brand Registry have access to Amazon Brand Analytics, a set of dashboards that explore customer search behavior and aggregated brand performance.


12. Automate Returns and Exchanges

Returns are an unavoidable part of ecommerce, but the back-and-forth can quickly drain time if every request needs manual attention. Many modern platforms let you automate the routine parts of the process so customers can resolve simple issues on their own.

Automation tools can generate prepaid return labels, update order statuses, and trigger refund workflows without you stepping in. If you sell in the Amazon store, built-in return settings allow eligible orders to go through an automated approval process. Customers get instructions instantly, and you stay focused on more important tasks instead of emailing label PDFs all day.

When set up correctly, automated returns don’t just save time. They also reduce friction for customers who just want a straightforward solution.


Bringing Automation Into Your Daily Workflow

Once you start automating more of your operations, the next step is weaving those tools into your everyday routine so they actually support the way you work. Most sellers don’t need a complete overhaul. A few small adjustments usually make a noticeable difference, especially when you’re trying to keep processes consistent without adding more noise to your day.

Here are a few practical habits that help automation run smoothly:

  • Review automated alerts once or twice a week instead of checking data constantly.
  • Decide which tasks belong to software and which still need a human decision, so your team isn’t duplicating work.
  • Update automation rules every so often, especially when your product line, pricing, or advertising strategy changes.
  • Keep a simple internal note or shared doc that outlines what is automated, so everyone stays aligned.
  • Use dashboards that highlight anomalies or slowdowns, not ones that force you to dig for information.

It helps to think about automation as something that grows with your business rather than a one-time setup. As your catalog expands and your data becomes more complex, refreshing your rules and dashboards keeps everything sharp. The goal isn’t to replace your judgment – it’s to give you cleaner signals so every decision feels a little easier and a lot faster.


Conclusion

The real value of ecommerce automation shows up in the day-to-day rhythm of your work. Tasks that used to slow you down start running quietly in the background, decisions come a little faster, and your team finally has space to focus on ideas instead of maintenance. Whether you’re improving product listings, tightening up fulfillment, refining your ad strategy, or tracking performance with tools like WisePPC, each layer of automation removes a bit of friction.

No system replaces your judgment, but the right automations give you cleaner signals and more time to act on them. And that’s ultimately how ecommerce businesses grow – not by working longer hours, but by freeing up the hours that matter. Once you see how much smoother operations can feel, it becomes easier to expand, experiment, and build processes that actually scale with you.


Frequently Asked Questions

What exactly counts as ecommerce automation?

Ecommerce automation is any tool or system that takes over a task you’d normally do by hand. That can be something simple, like sending order updates automatically, or something more involved, like adjusting ad bids, predicting inventory needs, or analyzing performance without you digging through reports.

Do small sellers actually need automation, or is it more for larger teams?

Smaller sellers often feel the benefits first. When you’re running everything yourself, even a few automated tasks can free up hours. Larger teams usually adopt automation to keep processes clean and avoid mistakes as complexity grows.

How much time does automation really save?

It depends on how many tasks you hand off, but most sellers notice reduced manual work within the first week. Pricing checks, data analysis, campaign updates, and customer notifications tend to save the most time because they happen so often.

Is it difficult to set up automation tools?

Most modern tools are designed to be straightforward. Many come with templates or default settings you can adjust. You don’t need to build scripts or know how to code unless you’re creating something highly custom.

Can automation replace a full team?

No. Automation handles repetition and pattern-based decisions, but it doesn’t replace strategic thinking, creative work, or customer understanding. The real goal is to free your team from busywork so they can focus on the parts of the business that actually move revenue.

Best Tips to Improve Your Product Photos

Good product photos used to be a nice bonus. Now they sit right at the center of the buying decision. When shoppers scroll through pages of similar items, they rely on visuals to judge trust, quality, and whether a listing is worth clicking at all. A clear image can communicate texture, size, and detail faster than any block of text.

The opposite is also true. Poor lighting or misleading photos push people away and often lead to returns when the product doesn’t match expectations. Anyone who has unboxed something that looked different from the listing knows how fast that breaks trust. Strong photography isn’t just creative polish anymore. It’s a core part of ecommerce. Better images help customers understand what they’re buying, reduce hesitation, and prevent avoidable frustration down the line.


Setting Up Your Toolkit: What You Actually Need

You don’t need a studio full of fancy gear to take strong product photos. Most sellers get great results with a small setup that’s easy to assemble and doesn’t cost much. The trick is choosing tools you understand well enough to use consistently.

  1. Camera: A good camera helps, but it doesn’t have to be top shelf. A DSLR, a point-and-shoot, or even a newer smartphone will all work as long as the images look sharp and natural. Many people end up using their phones because they already know how to operate them and don’t need to navigate ten different menus.
  2. Tripod: This is worth every penny. A tripod keeps the camera steady and prevents the slight hand shake that leads to blurry details. Many affordable ones do the job perfectly fine.
  3. White background: A plain white background keeps the viewer’s attention on the product. Something simple like a roll of white craft paper or a bendable white sheet attached to a table creates that smooth, seamless backdrop most marketplaces expect.
  4. Bounce cards: White foam boards help soften shadows and brighten dark patches without adding extra lights. They’re one of the easiest ways to make a shot look more balanced.
  5. Lightbox or light tent: For smaller items, a lightbox creates an even, soft glow around the product so you don’t have to fight with harsh light or awkward shadows. It’s not essential, but it helps if you shoot often.
  6. A stable surface: A simple table is usually enough. For tiny items, people sometimes use the back of a chair against the wall to create a vertical-to-horizontal sweep.
  7. Clips, tape, or glue dots: Small tools that save you from frustration. They keep backgrounds from sliding and stop lightweight items from rolling around while you’re trying to get the perfect angle.

Once you’ve gathered these basics, you’re already most of the way toward producing photos that look clean, intentional, and consistent from shoot to shoot.


Connect Your Product Photos to Real Performance With WisePPC

At WisePPC, we know great product photos do more than make a listing look polished – they shape how customers interact with your ads and detail pages. Our analytics platform lets you see that impact clearly. You can track changes in CTR, conversion rate, and ad efficiency right after updating your images, instead of guessing whether your creative work made a difference. With long-term historical data, multi-metric charts, and placement-level performance insights, it becomes easier to understand how visuals influence real shopper behavior over time.

We also help you connect the dots across marketplaces. Whether you sell on Amazon, Shopify, or both, our tools show how each listing responds to new photos, which products benefit most, and where your team should focus next. Real-time metrics, automated optimization suggestions, and granular filtering give you a complete picture of how your creative decisions play out in the numbers. Better images drive better results, and we make those results easier to measure, compare, and scale.


Building the Shot: Composition, Style, and Picking the Right Angles

Once your setup is ready, the next step is shaping the actual image. Composition and styling decide what the customer pays attention to, how they interpret your product, and whether the photo feels believable.

Show the Product Clearly, From Helpful Angles

A single straight-on shot rarely tells the whole story. Try mixing angles that highlight different parts of the item:

  • Front or head-on for the straightforward view.
  • Three-quarter angle to show depth and shape.
  • Overhead for items that lay flat or come as sets.
  • Closeups for textures, finishes, or small functional details.

Placing the product in the center usually keeps things clean, but some sellers experiment lightly with the rule of thirds to create space and balance. As long as the item stays easy to understand, a bit of variation can make the shot feel more natural.

Use Styling Thoughtfully

Styling isn’t about decorating the photo. It’s about giving customers a sense of how the product fits into real life. A lifestyle shot of kitchen tools, for instance, might include a cutting board or a soft hint of ingredients in the background. Just keep the extra elements subtle so they don’t steal attention away.

Different shot styles can help you cover a wider set of customer questions:

  • Individual shot: A clean, simple image of one item.
  • Group shot: Useful for bundles or collections where customers need to compare variations.
  • Lifestyle shot: Shows the product in context, helping people imagine how they’ll use it.
  • Scale shot: Puts the size into perspective by showing the object next to something familiar.
  • Detail shot: Ideal for jewelry, intricate patterns, or parts that matter to the buying decision.
  • Packaging shot: For customers who care about presentation and the unboxing experience.
  • 360-degree or rotational set: More advanced, but great for transparency and engagement.

If you sell, say, a ceramic planter, you might shoot it alone; then a group showcasing multiple colors; then a lifestyle moment where someone places a plant into it; and finally a closeup on texture or drainage holes. Together, these images build a rounded understanding of what the buyer is actually getting.


Lighting and Backgrounds: Creating Clarity Without Overcomplication

Lighting can make an average photo look polished, and it can also ruin a great product if it’s too harsh or uneven. Fortunately, you don’t need a studio setup to get lighting right. A bit of patience and a consistent routine usually do the job.

Keep the Background Simple

A white background remains the safest and most reliable choice. It keeps the focus where it should be and makes colors look cleaner. Most marketplaces expect at least one image on plain white, so it’s worth mastering that look.

For lifestyle photos, you can loosen things up. Introduce a bit of color, texture, or setting to signal your brand’s mood. A skincare brand might use soft beige tones; a tech accessory could sit on a modern desk surface. The goal isn’t decoration, it’s clarity. Let the background support the story, not overshadow it.

Use Light to Show the Product Honestly

Natural light works surprisingly well for many products. The sweet spot is often near a window where the light feels soft rather than direct. Morning or late afternoon light can create a more even, gentle tone.

If natural light isn’t dependable, artificial lighting gives you consistency. You can shoot whenever you need to, adjust warmth, and control where shadows fall. Even inexpensive LED panels can provide a steady, predictable result.

Bounce cards help more than people expect. A simple foam board can brighten a shadowy side or soften harsh light from a single-source setup. The small adjustments they make often go a long way in bringing out texture and detail without overexposing anything.

The main thing is to avoid lighting that distorts the product. If a shirt looks more vibrant under your lights than it does in person, customers will feel misled. Aim for accuracy first, enhancement second.


Preparing the Shot: A Practical Step-by-Step Workflow

Once you’ve set your lighting and backdrop, it’s time to bring the whole setup together. A little preparation goes a long way in preventing retakes later.

1. Position the Product Cleanly

Place the item on your chosen background and make sure it sits flat, straight, and centered. Tiny props like glue dots or small clips can stop objects from sliding or tilting. Clothing or accessories may need extra help from mannequins, hangers, or a simple stand.

2. Adjust Your Lighting

If you’re using natural light, move your table closer to a window and soften harsh sunlight with a thin sheet or piece of paper. For artificial light, set your primary light in front of the product and add a second light above or behind it to smooth out shadows. Bounce cards can brighten darker corners and reduce contrast.

It helps to take a quick test photo and adjust based on what you see rather than guessing. When you find a setup you like, jot down notes or take a photo of your lighting arrangement. You’ll thank yourself later when you want consistent shots across a new batch of products.

3. Set Up the Tripod

Place your tripod directly in front of the product and lock it in. This keeps your angles steady and helps maintain consistency across your images. Keeping the camera in the same position also makes retakes easier if you need them.

4. Dial In Camera Settings

Attach your camera or smartphone to the tripod and adjust basic settings so they match your lighting.

  • Match the white balance to your light source so the colors stay true.
  • Use a small aperture if possible to keep more of the product in focus.
  • Turn flash off to avoid sharp, unrealistic reflections.
  • If your camera allows it, shoot in RAW. If not, choose the highest-quality JPEG setting.

Aim for the product to fill at least 80 to 85 percent of the frame. Too much empty space weakens the image, but being too close can cut off essential details unless the shot is meant to be a closeup.

5. Take Multiple Angles

Even if you think you have the perfect shot, take several more from slightly different angles and distances. A small adjustment can uncover a more flattering perspective or reveal a detail that you missed earlier. Shooting extra now is easier than setting up everything again later.


Editing and Enhancing Your Photos Without Overdoing It

Editing isn’t about transforming your product into something it’s not. It’s about presenting it clearly, removing distractions, and making sure the colors and details match what buyers will receive. A light, steady hand usually gives the best results.

Adjust the Basics First

Start with simple corrections.

  • Brightness and exposure: Bring up shadows if they swallowed important details, or lower highlights if the photo looks washed out.
  • Contrast: Add a little definition to separate the product from the background.
  • White balance: Make sure the background actually looks white and the product’s colors appear natural.

These small tweaks often fix 80 percent of issues.

Correct Colors When Needed

Sometimes the background or lighting adds a tint that wasn’t meant to be there. A shirt might lean too blue, or a wooden texture might appear dull. Adjust saturation and hue gently until the item resembles what you see in person. The key is to avoid pushing colors so far that the product looks unrealistic.

Sharpen Selectively

A touch of sharpening can help emphasize texture or edges, especially on jewelry, tools, or fabric. Too much sharpening, though, makes the image look brittle or noisy. Use just enough to give the photo a clean finish.

Crop With Intention

Cropping helps you create consistent shapes across all your photos and guides the viewer’s attention. Trim out empty space, stray styling elements, or anything that distracts from the product. Keep the item centered unless you deliberately want a different composition.

Remove Unwanted Artifacts

Even with good planning, small issues can sneak into the frame. Dust specks, a crease in a backdrop, a glare on sunglasses, these are the kinds of distractions that editing tools can remove. Masking and selection tools in most photo software make these cleanups quick.

Know When to Bring in a Professional

If editing isn’t your strong suit, it can be worth outsourcing final retouching. Over-edited or poorly retouched images can hurt your listing. A professional can clean things up without crossing into artificial territory.

Follow Marketplace Requirements

Every platform has image guidelines. For Amazon, photos must meet certain size, clarity, and file format standards. Larger images (1,000 pixels or more on the longest side) allow for zoom, which helps buyers inspect details and can improve conversions. Stick with JPEG whenever possible, since it balances quality and file size well.


Optimizing Images for Faster Loading and Better Search Visibility

You can take amazing product photos, but if they take too long to load or search engines can’t make sense of them, customers might never reach your listing. A bit of image optimization helps your photos perform well across devices and improves discoverability.

  • Keep file sizes manageable: Large images slow down pages, especially on mobile. Compress your photos just enough to make them lighter while still looking sharp. Many editing programs and online tools handle this well.
  • Choose the right file format: JPEG works for most product shots because it handles color well and stays small when compressed. PNG helps when you need transparency or super crisp edges, though the files are heavier. GIF is limited in color but useful for simple graphics or small animations. In practice, most sellers stick with JPEG for their main photos.
  • Use clear, descriptive file names: Replace generic names like “IMG_3098.jpg” with something more meaningful, such as “stainless-steel-water-bottle-20oz.jpg.” Search engines pick up on these cues, and it helps your content get indexed correctly.
  • Write helpful alt text: Alt text isn’t visible to shoppers, but it supports accessibility and SEO. Keep it brief and accurate, for example: “Blue ceramic planter with drainage tray.” A keyword or two is fine, but the goal is clarity, not stuffing.
  • Use thumbnails wisely: Thumbnails help shoppers skim through colors, angles, or variations quickly. They also give search engines a better idea of the range of content on your product page.
  • Add images to your sitemap: If you run your own ecommerce site, including images in your sitemap helps search engines discover them more easily. This can improve your presence in image search results.
  • Make images responsive: A lot of browsing happens on phones. Responsive images ensure your photos load properly and display cleanly across desktop, tablet, and mobile without weird cropping or delays.


Common Mistakes to Avoid

Even a solid setup can fall apart if a few small details slip by unnoticed. These are the issues that quietly weaken the overall quality of product photos.

1. Skipping the White Background for Core Shots

Creative backgrounds are great for lifestyle images, but your primary photos should almost always use a clean white backdrop. It keeps attention on the product and aligns with marketplace expectations.

2. Letting Props or Models Steal the Spotlight

Styling can add context, but it shouldn’t overshadow the item you’re actually selling. If the viewer notices the props first, it’s a sign the composition needs adjusting.

3. Using Angles That Confuse Rather Than Clarify

Overly dramatic or artistic angles might look interesting, but buyers usually want simple, predictable views. Stick to clear angles like front, side, overhead, closeups, and soft 45-degree shots unless you have a strong reason to do otherwise.

4. Uploading Low-Resolution Images

Blurry or pixelated photos quickly turn shoppers away. High-resolution shots allow zooming and give customers confidence in the product’s details.

5. Ignoring Lighting Problems

Poor lighting leads to inaccurate colors and flattened textures. If something looks off, fix the exposure in editing instead of hoping it goes unnoticed.

6. Skipping the Tripod

Even small hand movements can add blur. A basic tripod removes that risk and helps you maintain consistent framing across shoots.

7. Forgetting SEO Basics

After all the effort of shooting and editing, it’s surprisingly easy to skip alt text or descriptive file names. These small SEO steps help search engines read your images and improve discoverability.


Final Word

Strong product photos aren’t just a final polish on your listing. They shape how shoppers understand your product, influence whether they click “add to cart,” and set honest expectations about what arrives at their doorstep. When your images are clear, well-lit, and consistent, customers feel more confident in what they’re buying. When they’re confusing or low-quality, you lose that trust before the conversation even begins.

As online shopping grows and the competition tightens, visuals become one of the simplest ways to stand out. You don’t need a huge studio or expensive gear to get there. What matters most is a thoughtful setup, accurate lighting, and a handful of images that show the product from angles and contexts that actually help the buyer.

If you treat photography as a core part of your ecommerce workflow rather than a last-minute task, you’ll see the difference – not only in how your listings look, but in how your customers respond.


FAQs

Do good product photos really increase sales?

Yes. Clear, accurate images help shoppers understand shape, texture, size, and overall quality. When people can evaluate a product visually, they feel more confident buying it, which usually leads to higher conversions and fewer returns.

Can I take product photos with a smartphone?

You can. Many recent smartphones have excellent cameras. Pair the phone with a small tripod, use even lighting, and adjust basic settings like white balance and focus. The quality difference between a phone and a DSLR is often smaller than people expect when the setup is done correctly.

How many photos should a product listing include?

Most listings benefit from at least six images. A solid mix might include a front view, an angled view, a few closeups, a scale shot, and a lifestyle or contextual photo that shows the product in use.

What background works best for product photography?

A clean white background is the safest choice for core images. It keeps the attention on the product and aligns with most marketplace requirements. Lifestyle images can use more creative backgrounds, as long as they don’t distract from the item.

What lighting should I use for product photos?

Soft, diffused light: natural or artificial, usually produces the most accurate results. Bright, direct light tends to create harsh shadows and uneven highlights. A simple diffuser or bounce card can help even everything out and show the product honestly.

success icon

Thank you for submitting request.

We will get back to you ASAP.